
Laminate Floor Installation
|
Michiana Flooring Experts located in Elkhart, Indiana is your premiere stop for laminate floor installation in our area. Laminate floor installation requires tearing up old carpet and laying down a snap together laminate floating floor may sound simple, but there are planning steps that can save time and money. First, we will need a pry bar, a six-foot level, and a hand trim saw. The flooring material will need to be more than the size of the floor, so we need to purchase a total volume that exceeds the floor size by fifteen per cent. We will choose either laminate flooring that has its underlayment, or we need to buy underlayment separately that is fifteen percent larger than the size of the floor. We will need underlayment tape. Laminated floor installation cost per square foot on our DIY project will be about $2.79 per square foot. The cost of material for our laminate floor installation will be in the range of $280 depending on the size of our floor. Following are some laminate floor installation tips should you have a similar project, but first we measure our floor and buy our Pergo Laminate flooring with underlayment.
What are laminate floors?Carpet Removal First, we cut the carpet across the door frame with a carpet knife or utility knife and one straight cut through the carpet from one end to the other. Then we pull the carpet up to release it from the tack strips holding it down. We are now able to follow the wall pulling the carpet away from the carpet strips around the wall perimeter. Now We roll the unattached carpet into one big log. We can remove the carpet from the house and into the dumpster at this point. Now we remove padding and tack strips. We use our pry bar to remove the nails that attach the strips to the subfloor. The padding and strips join the carpet in the dumpster. Baseboard Removal We remove baseboard by scoring the caulk at the top of the board along the wall with the utility knife and then pull it from the wall with a putty knife levering it away from the wall as we work our way to each corner. We use the pry bar to remove nails as we go. We complete this task shortly. Clean and Level The next step is for us to clean the floor and then level it. These steps are to prevent laminate floor installation problems. Our putty knife is used to scrape any bumps, encumbrances, or globs of paint or glue from the subfloor. We drive extruding nails in with our hammer and nail driver so as not to leave metal bumps. After we’re sure the floor is clean, we check with a six-foot level to make sure there are no bows. If there are any places that are more than three-sixteenths of an inch out of level over ten feet, we need to use a leveling compound. Climatize the Flooring After we have finished preparing the floor and while our leveling compound is drying, we need to put all the laminated flooring into the room for three or four days so that it can adjust to the temperature and climate of the room. Climatizing allows the flooring to expand or shrink as it would after installation. Layout the floor before flooring it We are now ready to start laying the laminate, but first, we must diagram and do the math to make sure everything fits and lays in the proper direction. We will install the flooring planks parallel to the view of the room. For our project, we are using Pergo flooring installation as our floor installation guide. Laying the planks in the parallel direction makes the room look larger than it would if they were perpendicular. We prep the door frames by cutting with a vibrating saw the lower portion of the frame the exact depth of the flooring. We figure the number of rows by getting the width of the room and dividing it by the width of the laminated flooring pieces. The division will also tell us what width the pieces of the last row need to be. Since we bought laminate that has underlayment, all we need to do now is cut the pieces for the last row to our measurement and lay the floor. |
|
The First Piece
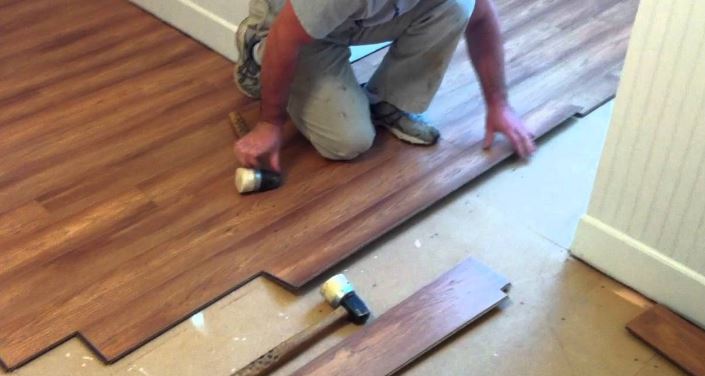
Before we peel back the covering on the underlayment to permanently place it, we lay out the first row for measurement. The last piece should measure more than twelve inches. If it would be less than a foot, then the first piece needs to be cut to make the last piece be longer. Peel the backing off the pieces and lay the row interlocking them at the tongue and groove joint. To make the first cut, flip the last board over and use a square to mark it even with the previous cut. Then mark which is the drop side, so you cut on the right side of the line. Then we use a circular saw to cut on the drop side. After the last piece on the row is in place, go to the next row. Avoid any off angles or conditions where the boards are not flush because these will weaken the joint and cause alignment issues on our next row. When we get to the door, measure the length of the board that needs to fit under the door. Cut it to fit the jamb. If it has a joint under the door, we join the pieces before placing under the doorjamb to be attached permanently to the floor. Use a rubber mallet along the length of each board to lock them n place and the tap it firmly to the floor. We use a spare piece of board to hold against the edges as we are aligning each piece to avoid damaging the tongue and groove. We use a staggered and systematic pattern to keep the installation straight.When near a wall, we use a pull bar to close up the gap. The pull bar allows a hammer to be away from the wall while striking cause the board to pull toward us. The baseboard will cover our ends after the installation. After we finish covering the floor, we install new baseboards. For great laminate flooring, call Michiana Flooring Experts located in Elkhart IN.
Before we peel back the covering on the underlayment to permanently place it, we lay out the first row for measurement. The last piece should measure more than twelve inches. If it would be less than a foot, then the first piece needs to be cut to make the last piece be longer. Peel the backing off the pieces and lay the row interlocking them at the tongue and groove joint. To make the first cut, flip the last board over and use a square to mark it even with the previous cut. Then mark which is the drop side, so you cut on the right side of the line. Then we use a circular saw to cut on the drop side. After the last piece on the row is in place, go to the next row. Avoid any off angles or conditions where the boards are not flush because these will weaken the joint and cause alignment issues on our next row. When we get to the door, measure the length of the board that needs to fit under the door. Cut it to fit the jamb. If it has a joint under the door, we join the pieces before placing under the doorjamb to be attached permanently to the floor. Use a rubber mallet along the length of each board to lock them n place and the tap it firmly to the floor. We use a spare piece of board to hold against the edges as we are aligning each piece to avoid damaging the tongue and groove. We use a staggered and systematic pattern to keep the installation straight.When near a wall, we use a pull bar to close up the gap. The pull bar allows a hammer to be away from the wall while striking cause the board to pull toward us. The baseboard will cover our ends after the installation. After we finish covering the floor, we install new baseboards. For great laminate flooring, call Michiana Flooring Experts located in Elkhart IN.